Tuesday, November 20, 2012

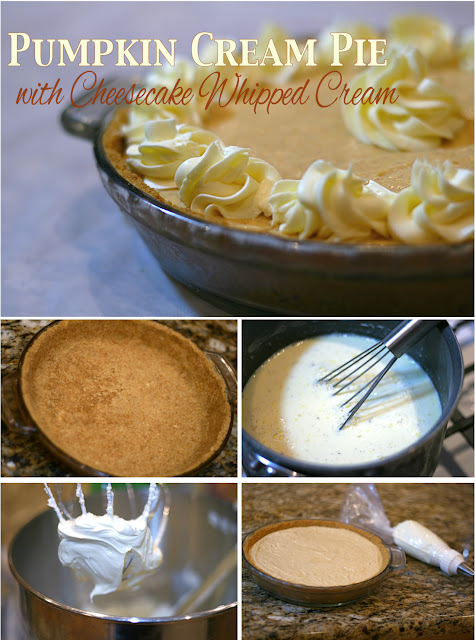
Pumpkin Cream Pie with Cheesecake Whipped Cream


I love this time of year and one of the reasons is because I love everything pumpkin... well that is everything except PUMPKIN PIE!  I have always been bothered that I can love pumpkin flavor so much but hate pumpkin pie and I have always said that it is the texture that I hate.  Well to solve this I came up with a pumpkin cream pie that has all the good pumpkin flavor but without that weird pumpkin pie texture.  This pie is so good and to make it even better I made a cheesecake flavored whipped cream to go on the top!  This recipe is a must try!  Oh and don't miss my great tip on how to get stickers off of glass dishes (or anything glass) at the end of my post!

Here is the graham cracker crust recipe... I know you can buy them at the store, but I promise that making your own is worth every effort!

Yields one 9 inch pie

Graham Cracker Crust (from America's Test Kitchen Family Cookbook... of course)

Ingredients:
1 1/4 cups graham cracker crumbs (about 8 graham crackers)
5 tablespoons unsalted butter melted
2 tablespoons sugar
pinch of salt (I add this just because I think most things are better with a pinch of salt)

Instructions:
1. Adjust an oven rack to the lower-middle position and heat oven to 325 degrees.  If you are making your own graham cracker crumbs put them in your food processor or in a ziplock bag and crush them until you have fine crumbs.
2. Melt the butter and mix the butter, sugar, salt, and graham cracker crumbs with a fork in a bowl until well mixed.
4. Pour mixture into a pie plate and evenly spread out then using a flat bottomed measuring cup or regular cup press the crumbs onto the bottom of the pie plate and up the sides until the crust is formed.
5. Bake until crust is fragrant and starting to brown about 15-20 minutes.
6. Let cool on counter until ready to use.
To Make Ahead: The crust can be stored at room temperature, wrapped tightly in foil, for up to 2 days.

Pumpkin Cream Filling

Ingredients:
1/2 cup plus 2 tablespoons sugar
1/4 cup cornstarch
1/4 teaspoon salt
5 large egg yolks
2 cups whole milk
1/2 cup evaporated milk
1/2 three inch vanilla bean split lengthwise*
2 tablespoons unsalted butter
1 teaspoon pumpkin pie spice (or 1/2 tsp cinnamon and a pinch of ginger, nutmeg, and cloves)
1/2 cup pure pumpkin puree
1/2 cup chilled heavy cream
2 tablespoons brown sugar

Instructions:
1. Whisk the sugar, cornstarch, and salt together in a medium saucepan.  Then add the egg yolks and quickly pour the milk and the evaporated milk in the pan very slowly while whisking the ingredients together.  Then take the vanilla bean that has been cut in half lengthwise and using a paring knife scrape out the seeds and add them to the saucepan along with the pod.  Heat the mixture over medium heat, whisking frequently until the mixture starts to simmer then continue to heat mixture for 1 minute until it is thick and smooth.  Then remove from heat and remove the vanilla bean pod.
2. Add the butter, pumpkin pie spice (or combination of spices) and the pumpkin puree and stir until smooth.  Then pour the mixture into a shallow dish so that it will cool faster, you can put it in the fridge if you are in a hurry.  Cover with plastic wrap flush to the mixture, this way a skin will not develop on the top.
3. Whip the heavy cream for about 30 seconds and then add the brown sugar and whip until soft peaks form.
4. Once the pumpkin cream mixture is cooled fold in the whipped cream and pour into cooled crust.  Then cover tightly with plastic wrap flush to the surface and refrigerate for at least two hours, preferably 4, or you can even refrigerate overnight which really gives the filling time to set up and the flavors to blend.

*I really recommend using a real vanilla bean in this recipe not just extract, I have made it both ways and the difference is HUGE!  I promise it is worth it!

Cheesecake Whipped Cream

Ingredients:
1 cup chilled heavy cream
3 tablespoons cheesecake instant pudding mix

Instructions:
1. Whip the heavy cream for about 30 seconds, add the pudding mix and whip until fluffy.


Instructions with pictures...
Pulse graham crackers until they are fine crumbs...

They should look like this, if you are using a ziplock bag I am sorry and I know it is a pain, but it is so worth it!


 Melt butter...
Add graham cracker crumbs, sugar, and salt then using a fork mash and stir together until it looks like this...

Pour into a pie plate...

 Spread evenly around the bottom...

Using a flat bottomed cup press the crumbs to the bottom and sides of the pan to create a crust that looks like this... 

Bake at 325 for 15 to 20 minutes... then take out of the oven and let cool.

Whisk cornstarch, sugar, and salt together in a medium sauce pan.

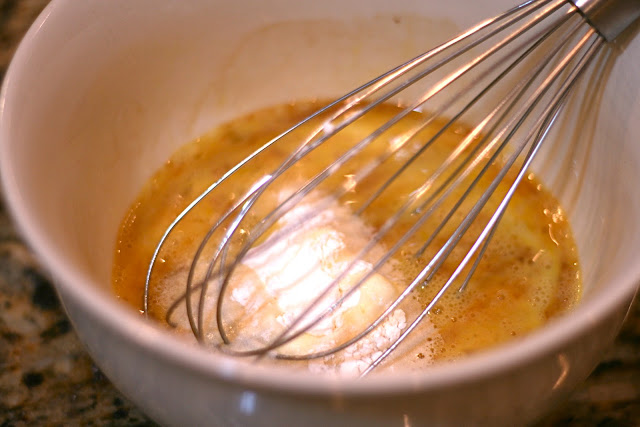
Add egg yolks...

 Then hurry and add the milk and evaporated milk but add it slowly and whisk the mixture as you pour.

 Add the vanilla bean scrapings and the pod and heat stirring frequently until it starts to simmer and then heat for 1 minute until mixture is smooth and thick, it should look like this...

 Remove form heat and take out the vanilla bean pod.

 There is no need to put pour the mixture into another bowl, I don't really know why I did that.  Just add the pumpkin puree and spices right to the mixture in the pan, then pour the mixture into a shallow dish and cover with plastic wrap with the plastic wrap flush with the surface of the mixture.

 Whip the cream until it looks like this...

 Then add the brown sugar and whip until it looks like this...

Fold the cream into the pumpkin cream until it is all incorporated and pour into the cooled crust.  

Cover with plastic wrap, make sure it is flush with the filling and refrigerate.  

To make the cheesecake whipped cream whip the cream until it is just starting to get fluffy then add the pudding mix and whip until it becomes fluffy and a bit stiff.

If you want you can just pour the cream on the top and spread it with a spoon but if you want to get decorative, use a 1M pipping tip and make swirls around the cake, or whatever you would like to do!


Enjoy!


Here is one of my favorite tips!  Have you ever had a sticker on something glass that will not come off no matter what you do?  I have this happen a lot in the kitchen with new dishes and this is by far the easiest way and the best part is there is NO MESS!

Tear off a piece of plastic wrap big enough to cover the entire sticker.  Then get the sticker and the plastic wrap wet and cover the sticker with plastic wrap and wait for 5 minutes.  Then take the plastic wrap off and the sticker should slide right off!  If there is any sticky residue it should just wipe off with a paper towel!  How easy is that?


Wednesday, November 14, 2012

Magleby's Chocolate Cake


If you live in Utah you probably know about Magleby's chocolate cake.  It is absolutely delicious!  I love how it is dense, moist, and chocolaty but not too rich.  There are a lot of blogs that have a copycat recipe for this cake and they taste IDENTICAL to Magleby's chocolate cake.  As I have been playing around with this recipe for a few years I have come up with a few alterations that I think make the cake even that much better.  My family agrees that the alterations make the cake better but it still has the signature Magleby's flavor and texture it is just a little more moist and has a little richer flavor. 

If you like dense and moist cake then this is the recipe for you!  If you don't think you like dense cake then you should still make this cake and I promise you will fall in love!  One of my favorite things about the cake is that it is so dense that it holds together really good after it is baked making it easy to layer and frost.  Another great thing about this cake is you don't need to use a mixer and it is so easy to make you really can't mess it up.  

Here is my version of the recipe that I prefer to make, it makes a lot of cake so if you just need one 9 by 13 pan you can half the recipe.  Usually when I make cakes I use round pans and I always make three layers, not only do I like the way it looks when it is cut but I also like that it gives the cake some height.  So this recipe will make three 9 inch round cake layers. 

Magleby's Chocolate Cake

Ingredients:
2 cups unsalted butter
2 cups water
3/4 cup cocoa powder plus 2 heaping tbsp
4 cups all purpose flour
2 cups granulated sugar
1 1/2 teaspoons salt
4 eggs, lightly beaten
2 teaspoons baking soda
1 teaspoon baking powder
2 cups light brown sugar
2 teaspoons vanilla
1 cup sour cream

Method:
1. Preheat oven to 325 degrees and prepare cake pans. 

2. In a small sauce pan heat butter until melted on medium heat.  Add water and cocoa powder and whisk until smooth, then bring to a boil and let boil for 30 seconds.  Then set pan to the side and let the mixture cool.

3. In a separate bowl sift together flour, granulated sugar, and salt.  I like to sift it together twice.  Add cooled chocolate mixture and stir until just combined and smooth.  

4. In a small separate bowl add eggs, baking soda, baking powder, and whisk until smooth.  The mixture will start to foam, but that is normal.  Then stir in the brown sugar and vanilla and whisk until smooth.  Pour the egg mixture into the batter and gently stir until all combined.

5. Fold the sour cream into the batter gently.

6. Divide into 3 greased 9 inch cake pans and bake at 325 degrees, for about 30-35 minutes or until a toothpick is inserted and comes out with only a few crumbs.  Cover with parchment paper and let cool.  I prefer to cover the layers with parchment paper then with a clean dish towel and pop them right into the freezer.  I always frost my cakes while they are frozen it makes it so much easier!

Chocolate Buttercream Frosthing

Ingredients:
1 cup unsalted butter at room temperature 
3 tablespoons cocoa powder
3 1/2 cups powder sugar 
1/2 teaspoon salt
1 teaspoon vanilla
1/2 cup milk

Method:
1. Beat butter, cocoa powder, powdered sugar, and salt in mixer with paddle attachment until smooth.  Add vanilla and milk and beat until fluffy.  This doesn't make enough frosting to cover and fill the cake, so if you plan on putting this frosting in between the layers I would double the recipe.  I prefer to use my favorite filling in this cake then just frost the top and sides of the cake with this frosting.  


Here are step by step instructions with pictures:


 Ingredients you'll need...


Melt the butter in small saucepan. 


Stir in water and cocoa until smooth and bring to a boil, then let boil for 30 seconds, and set aside to let cool. 


Sift flour, granulated sugar, and salt together into a large bowl.  I like to sift twice to make sure all the ingredients are well mixed. 

Pour chocolate mixture over flour mixture and mix gently until smooth. 


It should look like this...


Then add baking soda and baking powder to slightly beaten eggs and whisk until combined. 


Add the brown sugar and stir until smooth. 


 Add egg mixture to the batter and stir gently until smooth. 


 It will look like this... 


Gently fold in sour cream.  


It will look like this when it is ready to pour into prepared cake pans.  


Divide evenly into three 9 inch cake pans, then bake at 325 degrees for 30-35 minutes or until a toothpick is inserted into the center and comes out with just a few crumbs. 

I didn't take pictures of the frosting but it is so easy to make, I am sure you can figure it out.  There are a lot of different tips and tricks that I have discovered over the years that I use when I make this cake and every cake that I make.  So in a upcoming post I am going to share those tips and tricks so be sure to read that post and use them when you make this cake.  


Thursday, November 8, 2012

My Favorite Cookbook

I must admit, about a year ago I thought there was no point in buying another cookbook.  After all you can find a recipe for anything online.  I have my favorite food blogs that I get recipes off of all the time, and I started thinking that cookbooks are only for "older people" who don't know how to use the internet.  That is until my mom bought me a new cookbook last year, and it is official I have fallen in love!

That's right, I have fallen in love with a cookbook... my husband would be jealous but he is not and he fully supports my love for this cookbook.  He says it is the best thing to ever happen to our kitchen.  Now anytime I want to make something I ALWAYS check the red cookbook (as we like to call it) first before I even go online.  I have been using this cookbook for over a year and I have tried so many recipes and everyone of them have been incredible!  You would never guess that Summer Berry Gratin, Quick Tomato Sauce, Easy Chicken Enchiladas, Guacamole, or Cream of Tomato Soup could be so good, just to name a few recipes that I have loved.  My aunt who is an incredible cook and has been cooking for 40 years or so got this cookbook and she said that almost every recipe she has tried has replaced her old recipe!

The cookbook is called The America's Test Kitchen Family Cookbook (Third Edition) and it is a must have!


Not only are the recipes amazing but the instructions are very detailed and they have so many great tips and tricks throughout the book.  Another great thing about the book is at the beginning they have a buying guide. In the buying guide it goes through all the kitchen tools and gadgets that you should have and they recommend which brand they like the best.  

They also have a Healthy Family Cookbook which I just found out about and from what I hear it is great as well.  I want to get this cookbook as well, I have heard that there are a lot of recipes that are similar to the one I already have just made with less fat, but I think it will still be worth having. 


But the next cookbook I am going to add to my collection is this one... 


I could not be more excited about it!  Their baked goods in the cookbook I have are to die for, so I can't even imagine how much I would love this baking book!  

I know these cookbooks are available at most stores, they retail for about $34.95 each.  However, I saw the Family Cook Book and the Healthy Family Cookbook at Costco a little while ago and they were about $22-24 each, which is a really good deal.  I also know you can find them for a great price online.